Wednesday, January 25, 2012

VALENTINE HEART FRAME


Well, My dear husband got a head of Vanlentines day this year! He found a 2 pound, heart shaped, box of Russell Stovers chocolates. He said he couldn't resist and this is the biggest heart shaped box we have ever seen, to date. So we were looking at this big, beautiful box and thinking that it would be a waste to throw it out when the candy is gone. I was wondering if I could make a frame out of it. I took the chocolates and placed them in a storage container. Then started thinking(this can be extremely dangerous at times....) This is my tutorial on how to make a frame and inserts for this huge box. I am sure I am not the only one who has done this. But, it is fun to share any way!


As you can see from the tape measure, this box is quite large. I took the padded heart shaped insert(that came with the candy) and cut 2 heart shapes, out of the sponge board used for framing, to fit inside the top and bottom of the box. This will give me two frames to work with. I cut the heart shape for the box top a little larger than the padded shape. I actually cut it too large and had to carve it down some. I used a utility knife for the cutting and this seemed to work pretty good. Itook the insert out of the box so the hanger could be placed. I was trying to recycle old hardware pieces and use things I had on hand. Hubby had to replace a broken door knob. I took the old, metal, striker plate and used it on the inside of the box. Thinking this will give the box some reinforcement against hanging on the wall. The new door knob had a protective plastic striker cover. So I used the plastic one on the outside back of the box, to keep the nuts from boring into the heavy cardboard. I used 1/2 inch long, flat head bolts.


 Maked the inside of the box for the bolt holes.
 I used a small screw driver to make the needed holes for the bolts.
Gently screw the bolts through the striker plate and cardboard.inside.


 Put the nuts on the bolts, wind your hanging wire on the bolts and tighten the nuts.

I cut some light weight quilt batting and used some Aleens Tacky glue to keep it in place on the foam board. Then covered the insert with a fabric. Could also paint the board and throw some glitter on it. In my case I covered with fabric and decided, if I became adventurous, could change out inserts with holidays/seasons. My intension is too make small ornaments to hang in the frame.


Then secure the fabric by sewing the tucking and bunching the fabric to fut the shape of the heart.  VERY important. I found out the hard way! Start at the top of the heart shape first. This will allow you get the fabric tight in that area, so it doesn't bunch up when placing the insert in the box. I used a flat rounded tool (butter knife...) to smooth out the edges of the fabric, once the form is placed in the box. Tacking/sewing the fabric together will keep it in place, if you decide to change it out for other holidays.

Here is the fabric cover, foam board insert, installed in the box and ready to hang! Ran out of room for pictures. But, I took some spring themed jewlery and pins and decorated the heart. Will use the pins for attaching the cross stitched ornaments. Now if I can get time to cross stitch some. Would also make a nice memory frame, by adding family pictures and mementos.

NEW FRAMINGS!


FINALLY! After 7 years, we finally found a frame for the James Himsworth Wizard I stitched many moons ago! So here he is!

And I also found a pretty frame for a Just Nan hummingbird that I stitched last year.

Sunday, January 15, 2012

MAKING PROGRESS!

First off I would like you to meet Morty our kitty cat. He is quite character and a joy to be around! He loves to hunt just about anything and is a play monster, owning numerous toys to chase across the floor.


I love violets! In the summer I cruise the home improvement stores for violets that have been placed in the heat and are wilting into oblivian. I call them "save a plant". Usually they are down to one wilted leaf and I talk someone into selling the illfated violet for 0.50 cents or a dollar. Then I take my plant home. Place in miracle grow violets soil, water and set in an ideal window for recover. No extra added fertilizers(will burn the plant). The wine and white flowered violet is a save a plant from 2 summers ago. The violet with no blooms is this past summers project and the purple and white flowered violet is a 4 year old save a plant. This one has a sister plant that I divided from it last year and is also blooming. Nothing like pretty flowers in Winter!                                                                     
This was also packed away in a box with John Wayne. A Mirabilia Santa. I had started sometime ago and had completely forgotten about this one. Think this is OWS(old womans syndrome...) Will start stitching on this one sometime this week.                                    
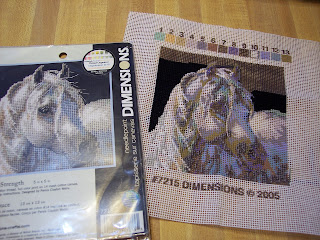
Years ago I had a larger version of this horse kit. I decided that it was needlepoint and I didn't have time to stitch. So I gave the big kit away to a friend. Then last week I found this one, which is 5"x5", bought the needlepoint kit and made some progess on it while traveling from a road service call, the other morning. Is quite a change to work on a painted canvas!             
I have been stitching on a small John Wayne portrait. This was something I started 2 years ago and found it packed away in a box. Have been making good progress in the last 2 weeks.

This is the Joan Elliott Wizard from last year. Haven't made any progress on this one, due to the crocheted blankets for the kids. Hoping to pick this one up again this week, too. He is really coming along and I am anxiouse to start in on him, again. The crystal ball castel is finished, with the exception of the beads.
DH has the flu... And I am trying not to get it! So the house is quiet today. After making some chicken vegetable soup for the invalid, I settled down for the afternoon and evening and stitched my little heart out! Made great progress on my Tulip picture. Will be starting the stem and leaf, next stitching session, then work on the second tulip. I have to say that it has been great fun to work on old, forgotten projects!

Sunday, January 8, 2012

KIDS CROCHETED BLANKETS

This is what took up alot of my time for christmas gifts. (not much cross stitching this past year) The grandkids blankets. Last june  I "volunteered" to make these. Thank fully they were all different, so I was not bored making them. Everyone liked their blankets as they choose their colors! Did not think I would like working with the red and black. Actually turned out to be my favorite.

DIMENSIONS A SNOWMANS KISS WIP


Another treat for completing old projects! Couldn't resist this one! Did exchange the 18 count aida for an opalescent 32 count linen. Have had this fabric stored away for sometime. And decided that since the snowman has some of the white fabric unstitched, that the irredescent threads in the 32 count, would be pretty sparkly effect.

DIMENSIONS KITTY KIT WIP

Decided I would treat myself, with a few new starts, for finishing old projects! Never liked kits. Stitched some any way. THEN I found the newer dimensions kits with presorted colors/threads. No more trying to decide if this is the dark pink, medium pink or not even pink, but mauve....

VERMILLION PEPPERS PILLOW UFO/WIP

This is a UFO due to the black fabric. I bought a yard of Cashell black 28 count linen and a yard of black 25 count line. The 25 count was fairly easy to work with. However, I found a different story with the 28 count. And this is unusual for cashell fabric. But, the fabric is so tightly woven that it is difficult to stitch cant count threads and is more like sewing fabric. I mucked on with this one for sometime. Working when I had good, bright light. Then my eyesight took the dive for a few years and this one definately when into the storage bin. Found it with others and have started working on it again. Made some progress by filling in most of the bananna peppers, next to the right of the red peppers. Hope to finish this one this year. If my eyes can deal with this fabric. Some of you may ask why I kept working with this black fabric. Well... it was one of those things of I paid for the fabric, started something and kept mucking through, even if it is difficult. Thats what I get for being stubborn!

CAT ORNAMENT


This is a project I stitched many years ago and never completed the outlining. Infact, this was so long ago that it is stitiched on 11 count aida and I CRINGED when I looked at the sloppy back on this. Fortunately my sloppy backside is sewn itno a pillow hanger and will not been seen! My mother in law loves cats(who doesn't!) and she was thrilled to recieve this as one of her christmas gifts.

HUMMINGBIRD ORNAMENT

This is a completed UFO. Of sorts. This is a long story, and to make a story longer... Years ago I bought several Dimensions Daydreams kits. Mom loves birds of any kind. Well, with the exception of sparrows. Four of the kits are hummingbird kits. (The other 2 are the 4 birds in progress, now.)Bought two of each pink and 2 blue back grounds. exchanged the aida for linen on the two pink kits. Stitched those and came out beautifully and fit in their respective matts. A few months later I started on one of the blue ones. exchanged aida fabric for linen. It soon became apparent that I had the wrong count linen and the hummer was not to fit in the pretty matt frame included in the kit. And volla, a UFO was born. In my quest to finish old projects, Decided to finish this and make into an ornament for my mom for christmas. Technically the original work is not completed and this will be another project for later.

PARROT TULIPS WIP

This one has been lurking in the shadows for sometime.  I put this one away due to not liking the colors complimenting the white in the tulips. The magazine picture looks nice. But, in practical color use, they looked muddy. I changed the muddy brown shading colors to lightest pinks and a winter white. And liked the result. Will also arrange the leaves so they are closer to the flowers and not yards of stems, which seems like a waste of fabric and stitching time. I find that most all of my UFO's are due to not liking colors or problem fabric.


4 BIRDS UFO/WIP


This is a UFO that I have been working on the past few weeks. I have my UFO's arranged and numbered. This has not worked very well as it seems more like WORK, than fun stitching! So, I have abandoned the numbering system and make a point to work on atleast one of them every day or so. I look through the big, brown paper bag(the box has been discarded) with the nice handles and dig around until I find something I want to stitch. Even managed to finsh a few, in time for christmas gifts.

PRARIE SCHOOLER SANTA 1994

The holiday season seem to fly by! Especially when stitching and crocheting 3 blankets, and trying to fit them in with all the repair work in the yard. Of course, all of the colors are quite different than the chart. Figured there were hundreds if not thousands of look alikes... First I used the lovely fabric, my bb swap partner, Melissa hand dyed. Very soft and nice to work with. Then, used some DMC variations threads in the mix. Don't know if you have used this before. But it is very soft egyptian cotton and silky to the touch. Was very nice to work with and went well with the fabric. I haven't made santa  into anything, yet. Have to dig through my fabric stash and find a complimentary pattern. I was thinking santa fabric. But, then I have some quilted sunflower cotton fabric that may look nice. Will update with a finish pic when I decide!